Crispy, light, savoury and absolutely moreish – these Crispy Onion Bhajis are a must make! Thinly sliced onions are mixed and coated in a chickpea flour batter then dropped into a frying pan of hot oil and cooked until crisp.

Originally posted 5 February, 2016. Updated pictures post and recipe 14 September, 2021 with new photos, tips and simplified recipe.
What are Onion Bhajis?
onion bhajis = onion fritters
They’re thinly sliced onions coated in a simple, spiced batter then fried until golden and crisp.
Depending on the region in India, you might find onion bhajis referred to as a number of different names including: onion pakora, kanda bhajia, kanda bhaji, and pyaz ke pakode to name a few.
onion bhajis Ingredients
Spices and fresh ingredients often vary slightly from recipe to recipe but the main ingredients usually remain the same. This onion bhaji recipe is made up of:
- Onions – I used a couple of white onions here but you can also use red onions and yellow onion.
- Gram Flour – Gram flour is often sold under a variety of different names. If you can’t find gram flour look for chickpea flour, besan flour and/or garbanzo bean flour.
- Baking Powder – A small amount of baking powder helps to create an ultra crispy exterior crust by forming tiny air bubbles across the surface of the fritter. This is what helps to makes these onion bhajis more light and crispy than crunchy.
- Since this recipe includes lemon juice, you can substitute baking soda (bicarbonate of soda) here if necessary.
- Dried Spices – A little salt, ground cumin, and turmeric powder is all you need as far as dried spices go. Feel free to spruce up the batter with additional herbs and spices if desired.
- Other popular kanda bhaji spices include: garam masala, curry powder, chili powder and garlic powder.
- Fresh Aromatics – You’ll need 1-2 green chillies and fresh cilantro (coriander leaves). Finely chop and add to the batter.
- Lemon Juice – A teaspoon of lemon adds a slight, but bright pop of flavour.
- Water – Mix in about 5-6 tablespoons. You just need enough water to transform the mixture into a thick batter.
- Oil for Frying – Ideally you want to use an oil with a high smoke point. The higher the smoke point the more suitable it is for frying (vegetable, peanut, rapeseed, etc). Avocado oil (though pricey) has a high smoke point making it a decent, healthier option for frying.
How to Make Onion Bhajis
Altogether the process is quite simple.
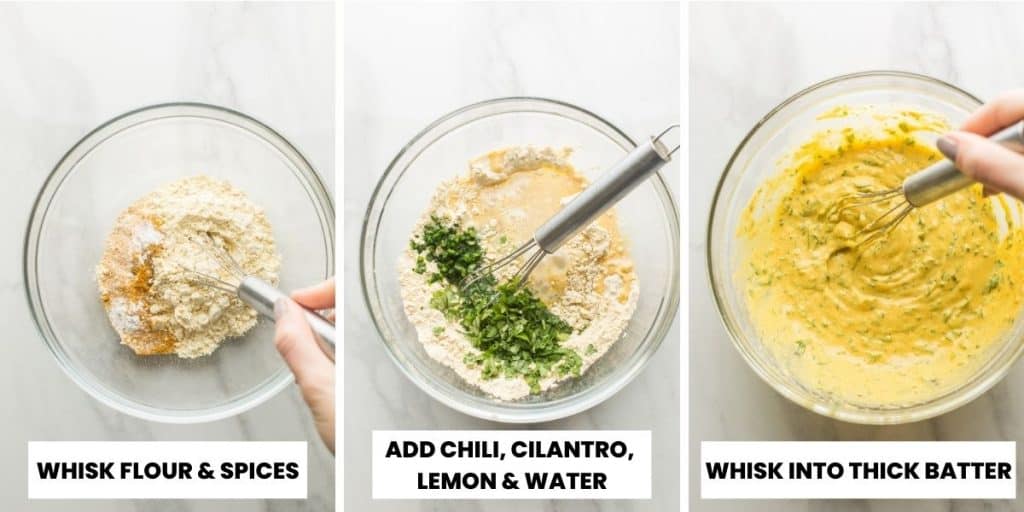
- Whisk together the dry ingredients in a large mixing bowl.
- Add the fresh and wet ingredients (except the onion). Mix into a thick pancake-like batter.
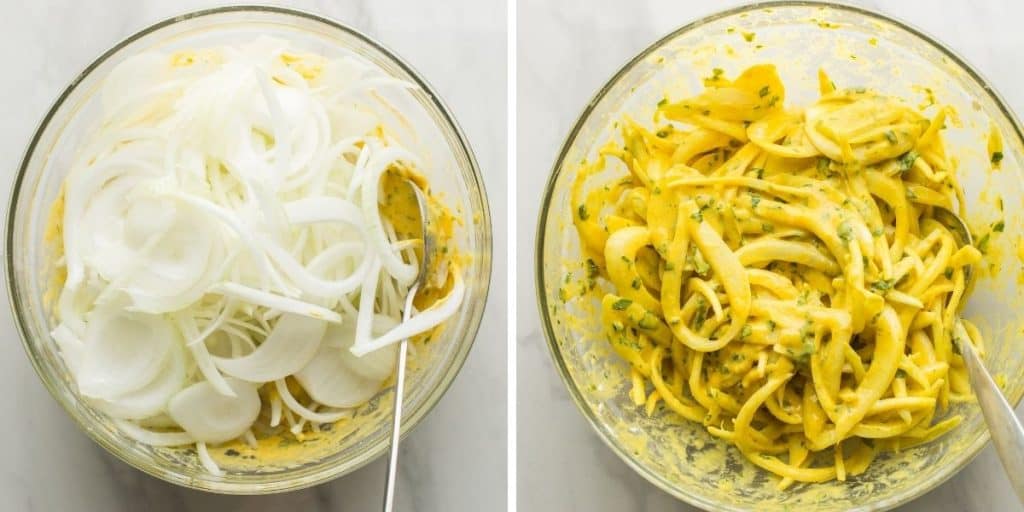
- Add the onions and coat in batter.
FYI: Ideal Frying Temperature
If the oil is too hot, the bhajis will burn. If it’s too cold, the bhajis will take longer to cook and end up soggy.
Ideal frying temperature is between 350°F-365°F (177°C – 185°C).
Use a cooking thermometer for them most accurate temperature read.
If you don’t have a cooking thermometer you can gauge temperature with a wooden spoon. Stick the end of a wooden spoon in your oil – if you see lots of little bubbles form around the spoon and float to the surface you’re in the right region. If the bubbles pop up fast and aggressive, lower your temperature.
Fry Until Golden and Crisp
- Place a wire rack over large baking sheet and set aside.
- Warm a large pan with oil over a medium heat.
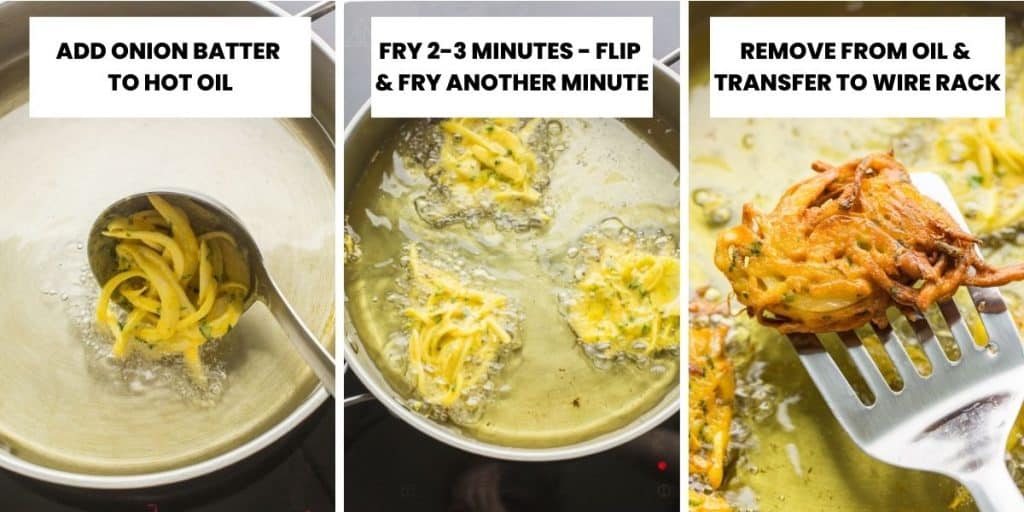
- Carefully drop a couple tablespoons of the mixture in to the hot oil to fry.
- Cook about 3-4 fritters at a time.
- Leave space between each bhajis so you don’t over crowd the pan.
- Fry a few minutes on each side. The edges of the bhajis should be golden brown and crisp
- Use a slotted spoon to remove the fritters from the oil then place on the wire rack to let the excess oil drip off.
- Repeat this process until all of the batter has been fried.

Final Tips & Questions
Can I make onion bhajis in advance or save leftovers for later?
- If you want them crispy, fresh is best. That being said, – you can absolutely make these ahead of time or finish at a later day.
- In an air fryer: Reheat in an air fry for about 4-5 minutes. This is a great method for keeping things nice and crispy.
- Under a medium grill: Reheat for about 5 minutes (flip halfway through). This is another great option to maintain that crisp factor.
- Microwave: This will warm the bhajis back up, but they won’t be crispy this way.
Freeze for Later
- Cook then cool completely on a wire rack.
- Line a baking sheet (one that can fit in the freezer) with parchment paper. Spread the bhajis across the baking sheet in an even layer. Place in the freezer for 2-3 hours until the firm up.
- Transfer the frozen/partially frozen bhajis to an airtight container or freezer safe bag and freeze up to one month.
- Thaw and reheat: Thaw the onion bhajis by placing them in fridge overnight then reheat in the oven at 400°F/205°C for 5-6 minutes. Flip the bhajis over halfway through reheating.

Enjoy as delicious side or starter to your favourite homemade Indian food or simply as a naturally gluten free and vegan snack.

Onion Bhajis
Crispy Onion Bhajis make the perfect naturally gluten free and vegan snack or starter. Light, crispy, and completely moreish!
Ingredients
- 2 large onions, thinly sliced
- 1 cup (100 g) gram flour/chickpea flour
- 1/2 teaspoon baking powder
- 1 teaspoon salt
- 1 teaspoon ground cumin
- 1/2 teaspoon ground turmeric
- 1-2 green chillies, finely chopped
- 2 tablespoons freshly chopped cilantro
- 1 teaspoon lemon juice
- 5-6 tablespoons (75-90 ml)water
- oil for frying
Instructions
- In a large mixing bowl whisk together the flour, baking powder, salt, cumin and turmeric until combined.
- Add the chili, cilantro, lemon juice and water. Mix into thick batter.
- Add the sliced onions to the bowl. Mix well until all of the onions are fully coated in batter. I find this step is easiest and most thoroughly done with hands.
- Heat a large skillet or wok over medium heat. Add enough oil so that you've got about an inch covering the bottom of the pan.
- When the oil is hot, carefully drop spoonfuls of the batter into the hot oil. Cook about 3-4 bhajis at a time (too many will crowd the pan and make it difficult for them to crisp up). Fry for about a minute on each side and then flip the bhajis to get the other side until golden.
- Remove each bhaji with a slotted spoon and transfer to a wire rack to drain the excess oil. Continue until all of you batter in gone.
- Serve these hot on their own or with a cucumber mint raita and enjoy!
Notes
- Red, white, yellow and/or brown onions all work.
- Ideal oil temperature for frying is between 350°F-365°F/177°-185°C.
- You can quickly and easily slice your onions with a spiralizer or mandolin slicer if desired.
Nutrition Information
Serving Size:
1 bhaji Calories: 51Saturated Fat: 1gSodium: 212mgCarbohydrates: 7gFiber: 1gSugar: 2gProtein: 2g




Mariamzukas says
I am going to be making this today for 27 people with natural yogurt garlic mints souce wish me lucky
Sarah Nevins says
Oooh – good luck! Hope everyone enjoys it!
France says
My husband and I love bhaji and this recipe is the best ever.
Sarah Nevins says
Yay! So glad to hear that – thanks for coming back and leaving a review!
Adele says
Love this recipe 😍
Sarah Nevins says
Thanks, Adele!
Melissa Morais says
Tried this recipe today and my family loved it! It was super simple and quick to make, and the result was certainly worth it, 100% recommend!
Sarah Nevins says
Yay! Thanks so much Melissa – so happy you all enjoyed it!
Fern says
Hi
Thank you so much for sharing this recipe. Can I check if I wanted to make these in advance in the morning and then eat in the evening what would I do rehear in oven or refry them?
Kind regards
Fern
Sarah Nevins says
Hi Fern! They won’t be as crispy, but you can reheat them in the oven. I think about 400°F/200°C for about 15-20 minutes should be enough. Hope that helps!
Paul Swann-Clark says
Hi, I loved the recipe – thanks, they were very simple to make and delicious 🙂 No good for my CORVI-19 snacking habit though ;/
But as far as the Spiralizer goes, that was a bloody nightmare! I read your post here and it happened that day I saw one on the shelves… impulse purchase… was chuffed to nuts! But how the heck do you use it for onions? Mine is a handheld and the onion just jammed eventually clogging the ports and rotated within the onion layer.. I tried cutting the onion in different directions but was no better. Eventually, gave up and reverted to my knives!
So, if you have a method I’m all ears??? 🙂
Love your website btw
Sarah Nevins says
Hi Paul! So glad you enjoyed these! I think it must just depend on the type of spiralizer. I’ve gone through a few different types and some were much easier to use than others. If yours isn’t working well with onions I think it might be easier to stick with knives. At least it will save you the hassle of cleaning your sprializer!
MFChris says
Chop off the top end and peel leaving the onion whole. About half way up run a skewer through the onion, and another one between that and the root. Should hold the layers of onion together better.
Riya says
I make Onion Bhajis all the time along with lots of other Indian dishes but this recipe is another level. Thanks Sarah.
Delicious, went down so quick didn’t manage to take pictures.
An excuse to make them again 😉
Sarah Nevins says
Yay! Thanks Riya – glad you enjoyed them!
Alex says
These were amazing! And now a fan favourite. Thanks for sharing this recipe.
Sarah Nevins says
Thanks Alex – so glad you enjoyed them!
katie says
Amazing recipe! my go to, super quick and easy to make 🙂
Sarah Nevins says
Thanks Katie!
Katie says
Hi Sarah
Had an amazing success with the onion bhajis – incredibly easy. I thought the batter was a little thick so added a couple of extra spoons of water and deep fried instead of shallow frying. Result: delicious – many thanks 🙂
Sarah Nevins says
Yum! Glad you enjoyed them – thanks, Katie!