Crispy, light, savoury and absolutely moreish – these Crispy Onion Bhajis are a must make! Thinly sliced onions are mixed and coated in a chickpea flour batter then dropped into a frying pan of hot oil and cooked until crisp.

Originally posted 5 February, 2016. Updated pictures post and recipe 14 September, 2021 with new photos, tips and simplified recipe.
What are Onion Bhajis?
onion bhajis = onion fritters
They’re thinly sliced onions coated in a simple, spiced batter then fried until golden and crisp.
Depending on the region in India, you might find onion bhajis referred to as a number of different names including: onion pakora, kanda bhajia, kanda bhaji, and pyaz ke pakode to name a few.
onion bhajis Ingredients
Spices and fresh ingredients often vary slightly from recipe to recipe but the main ingredients usually remain the same. This onion bhaji recipe is made up of:
- Onions – I used a couple of white onions here but you can also use red onions and yellow onion.
- Gram Flour – Gram flour is often sold under a variety of different names. If you can’t find gram flour look for chickpea flour, besan flour and/or garbanzo bean flour.
- Baking Powder – A small amount of baking powder helps to create an ultra crispy exterior crust by forming tiny air bubbles across the surface of the fritter. This is what helps to makes these onion bhajis more light and crispy than crunchy.
- Since this recipe includes lemon juice, you can substitute baking soda (bicarbonate of soda) here if necessary.
- Dried Spices – A little salt, ground cumin, and turmeric powder is all you need as far as dried spices go. Feel free to spruce up the batter with additional herbs and spices if desired.
- Other popular kanda bhaji spices include: garam masala, curry powder, chili powder and garlic powder.
- Fresh Aromatics – You’ll need 1-2 green chillies and fresh cilantro (coriander leaves). Finely chop and add to the batter.
- Lemon Juice – A teaspoon of lemon adds a slight, but bright pop of flavour.
- Water – Mix in about 5-6 tablespoons. You just need enough water to transform the mixture into a thick batter.
- Oil for Frying – Ideally you want to use an oil with a high smoke point. The higher the smoke point the more suitable it is for frying (vegetable, peanut, rapeseed, etc). Avocado oil (though pricey) has a high smoke point making it a decent, healthier option for frying.
How to Make Onion Bhajis
Altogether the process is quite simple.
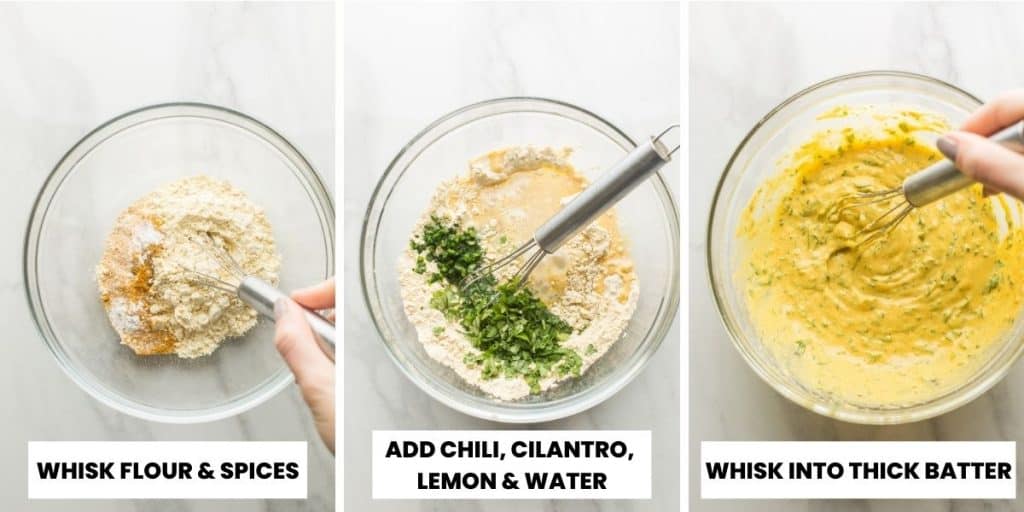
- Whisk together the dry ingredients in a large mixing bowl.
- Add the fresh and wet ingredients (except the onion). Mix into a thick pancake-like batter.
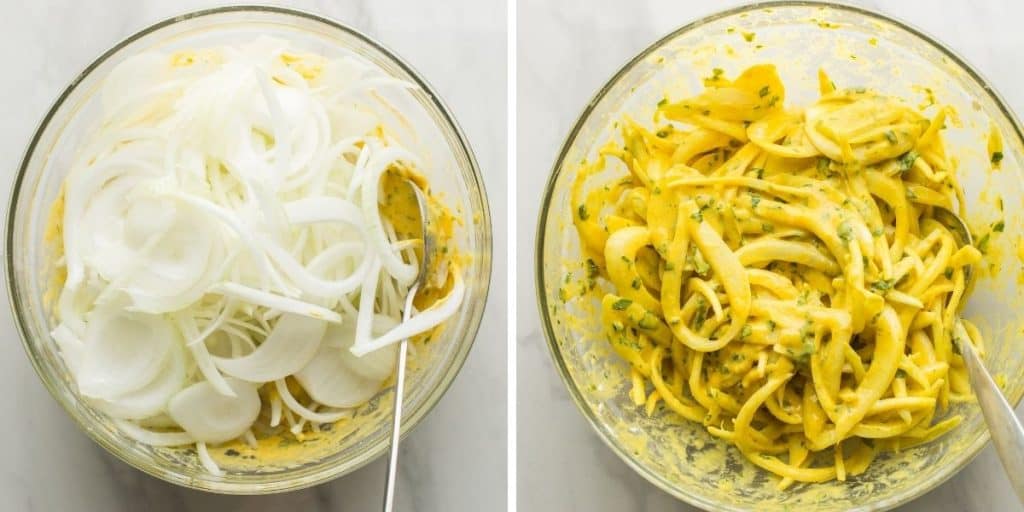
- Add the onions and coat in batter.
FYI: Ideal Frying Temperature
If the oil is too hot, the bhajis will burn. If it’s too cold, the bhajis will take longer to cook and end up soggy.
Ideal frying temperature is between 350°F-365°F (177°C – 185°C).
Use a cooking thermometer for them most accurate temperature read.
If you don’t have a cooking thermometer you can gauge temperature with a wooden spoon. Stick the end of a wooden spoon in your oil – if you see lots of little bubbles form around the spoon and float to the surface you’re in the right region. If the bubbles pop up fast and aggressive, lower your temperature.
Fry Until Golden and Crisp
- Place a wire rack over large baking sheet and set aside.
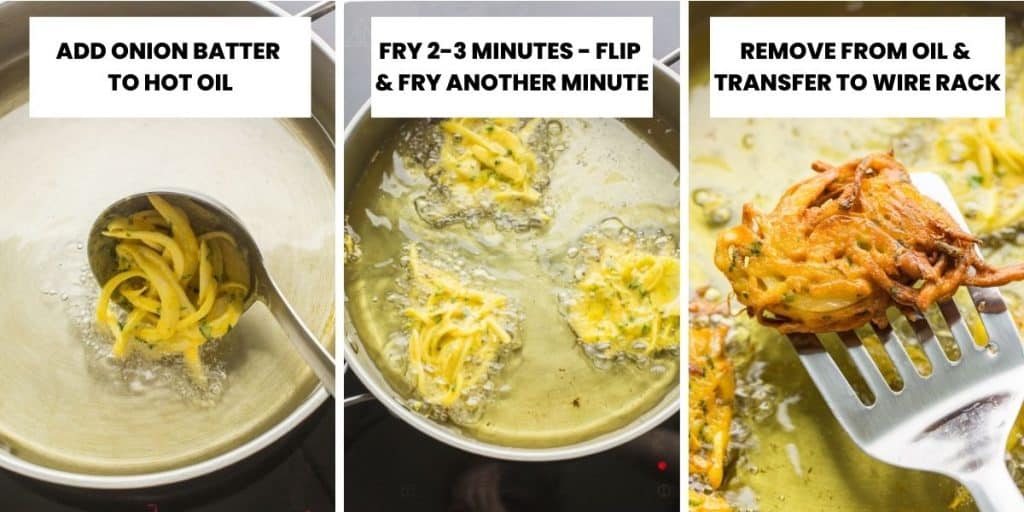
- Warm a large pan with oil over a medium heat.
- Carefully drop a couple tablespoons of the mixture in to the hot oil to fry.
- Cook about 3-4 fritters at a time.
- Leave space between each bhajis so you don’t over crowd the pan.
- Fry a few minutes on each side. The edges of the bhajis should be golden brown and crisp
- Use a slotted spoon to remove the fritters from the oil then place on the wire rack to let the excess oil drip off.
- Repeat this process until all of the batter has been fried.

Final Tips & Questions
Can I make onion bhajis in advance or save leftovers for later?
- If you want them crispy, fresh is best. That being said, – you can absolutely make these ahead of time or finish at a later day.
- In an air fryer: Reheat in an air fry for about 4-5 minutes. This is a great method for keeping things nice and crispy.
- Under a medium grill: Reheat for about 5 minutes (flip halfway through). This is another great option to maintain that crisp factor.
- Microwave: This will warm the bhajis back up, but they won’t be crispy this way.
Freeze for Later
- Cook then cool completely on a wire rack.
- Line a baking sheet (one that can fit in the freezer) with parchment paper. Spread the bhajis across the baking sheet in an even layer. Place in the freezer for 2-3 hours until the firm up.
- Transfer the frozen/partially frozen bhajis to an airtight container or freezer safe bag and freeze up to one month.
- Thaw and reheat: Thaw the onion bhajis by placing them in fridge overnight then reheat in the oven at 400°F/205°C for 5-6 minutes. Flip the bhajis over halfway through reheating.

Enjoy as delicious side or starter to your favourite homemade Indian food or simply as a naturally gluten free and vegan snack.

Onion Bhajis
Crispy Onion Bhajis make the perfect naturally gluten free and vegan snack or starter. Light, crispy, and completely moreish!
Ingredients
- 2 large onions, thinly sliced
- 1 cup (100 g) gram flour/chickpea flour
- 1/2 teaspoon baking powder
- 1 teaspoon salt
- 1 teaspoon ground cumin
- 1/2 teaspoon ground turmeric
- 1-2 green chillies, finely chopped
- 2 tablespoons freshly chopped cilantro
- 1 teaspoon lemon juice
- 5-6 tablespoons (75-90 ml)water
- oil for frying
Instructions
- In a large mixing bowl whisk together the flour, baking powder, salt, cumin and turmeric until combined.
- Add the chili, cilantro, lemon juice and water. Mix into thick batter.
- Add the sliced onions to the bowl. Mix well until all of the onions are fully coated in batter. I find this step is easiest and most thoroughly done with hands.
- Heat a large skillet or wok over medium heat. Add enough oil so that you've got about an inch covering the bottom of the pan.
- When the oil is hot, carefully drop spoonfuls of the batter into the hot oil. Cook about 3-4 bhajis at a time (too many will crowd the pan and make it difficult for them to crisp up). Fry for about a minute on each side and then flip the bhajis to get the other side until golden.
- Remove each bhaji with a slotted spoon and transfer to a wire rack to drain the excess oil. Continue until all of you batter in gone.
- Serve these hot on their own or with a cucumber mint raita and enjoy!
Notes
- Red, white, yellow and/or brown onions all work.
- Ideal oil temperature for frying is between 350°F-365°F/177°-185°C.
- You can quickly and easily slice your onions with a spiralizer or mandolin slicer if desired.
Nutrition Information
Serving Size:
1 bhaji Calories: 51Saturated Fat: 1gSodium: 212mgCarbohydrates: 7gFiber: 1gSugar: 2gProtein: 2g




Sylvie St-Jacques says
These are fantastic! They are a favourite in our house now! Thx!
Sarah says
Thanks Sylvie! So glad you enjoyed them!
Wanda White says
These look fantastic. Do you think that these could be made ahead of time and then re warmed and served as an appetizer? If so – how far ahead do you think they can be made and what is the best way to rewarm them? Thanks.
Sarah says
Hi Wanda! In my own experience these really are best when served fresh – after awhile they start to loose their crispness. I have however seen other people make them in advance, let them cool, and then warm them up in the oven to put a little life back in them.
Eddie Cruzet says
Better place them on a wire mesh to cool and drain the excess oil after
frying, it will be crispier.
Donna says
I’ve made these twice now and we absolutely love them. Brilliant as an entree for a hungry crowd and so easy and delicious. Thanks so much for the yummy recipe.
Sarah says
That’s awesome! SO glad you like them and thanks so much for coming back to let me know what you thought!
Sudha says
These are bhajias not bhajis. Bhaji means vegetables in Hindi and this savoury is called bhajia.
Sarah says
Hi Sudha! Thanks for the info! I’ve always seen it spelled bhaji but it looks like it goes by multiple spellings according to the wiki page https://en.wikipedia.org/wiki/Bhaji
Sophie says
Made these tonight and they were absolutely delicious! I could eat a whole plate of them. Thanks for the great recipe!!!
Sarah says
Yay! Glad you liked them! 🙂
Tutiqka says
Made these for my brothers vegan birthday bash, they went down a treat. My dad couldn’t believe I made them… don’t exactly know how to take that, but nonetheless a fault free recipe. Many thanks
Sarah says
Ha! That sounds like something family would say 😀 Thanks for coming back to let me know how it went – so glad you guys liked them!
Jose Gomes says
Hi, Thanks a lot for this wonderful and tasty Bhaji recipe You’re a winner the web is awash with bhaji recipes but yours is unique, But I like to eat mine with tangy Tamarind Chutney.
Best wishes
Jossy
Sarah says
Thanks Jossy! Tamarin Chutney sounds delicious! I’ll have to try it!
Amber says
By thick batter do you mean paste-like or more like a thick salad dressing consistency? I’m thinking of a thick Caesar or something. Just trying to get a reference for how thick the batter should be. Thanks!
Sarah says
Kind of like a thick dressing is probably the most accurate. The chickpea flour makes it feel sticky, but it’s not dense. The batter will drip off of the onions a little bit when you lift it out of the batter. Hope that helps & I hope you like them as much as we do!
Rosetta Robinson says
Successfully made these DELICIOUS bhajis tonight. As always with anything I try from the internet – I’m always sceptical, but hands down these were amazing. I cooked these for my mum, and she gave them a solid 9/10. Sadly I couldn’t chop the green chilli and coriander finely enough due to blunt knifes so made do with mild chilli powder. I served them up with vegan soya plain yoghurt and mint sauce with wholegrain rice. Thank you for sharing this recipe!
Sarah says
Ooh yay! So glad you guys liked them! Thanks for coming back to leave a comment letting me know how it went! 🙂