No need to run to the store to satisfy your snacking needs! These homemade cheesy gluten free crackers are easier to make than you might think. With just six, basic ingredients and a little patience waiting for the dough to chill you’ll be done before you know it! | Gluten Free + Nut Free + Gum Free

I think I like these crackers too much for my own good. I don’t know what it is about cheese crackers (Cheez Its are my all time fav junk food) but I lose all sense of self control when they’re around.
Fortunately with only six ingredients and zero preservatives, I can feel a little better eating my fair share of crispy, crunchy cheesy goodness.
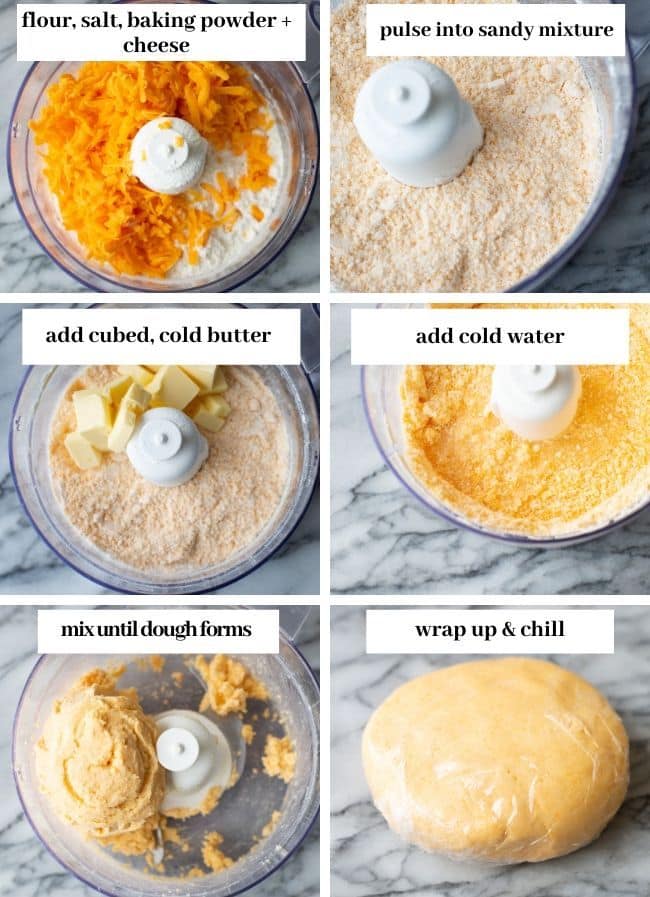
Altogether the cracker making process isn’t too hard, but it does take a little time to chill, slice and transfer the dough to the baking sheets.
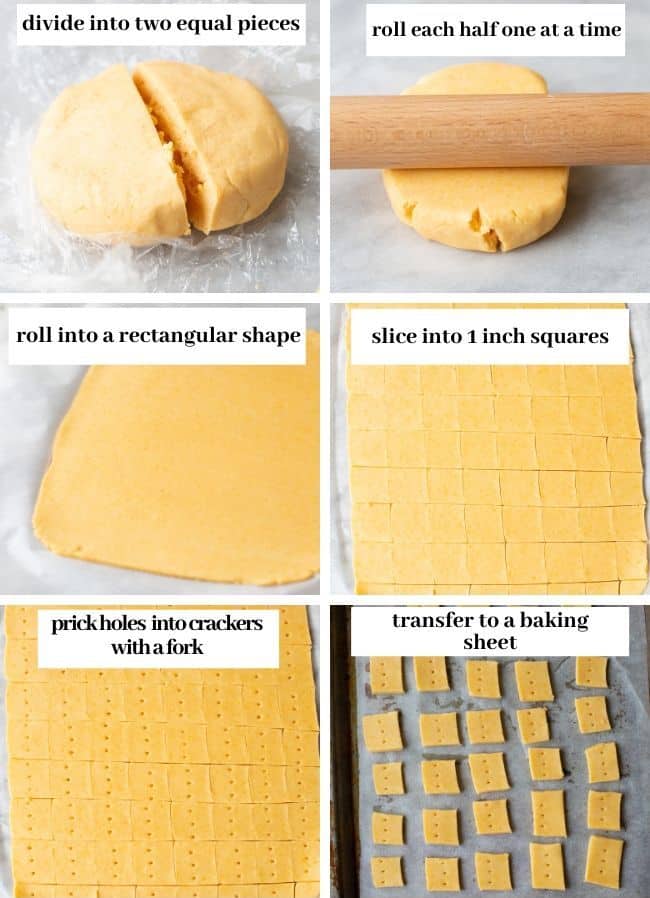
Rolling and cutting the dough into little squares can feel a little tedious but not actually that difficult. Just put on some music or a good podcast and you’ll be done before you know it.
Quick Questions Before You Make these Cheesy Gluten Free Crackers
What kind of flour should I use? Do I need a blend with xanthan or guar gum?
- Any generic all purpose gluten free flour blend will work for these crackers including my homemade gluten free flour blend.
- You do not need to use xanthan or gum for the crackers. However, if you gf flour blend already contains some sort of gum that’s also not a problem.
- If you’re looking for a grain free + vegan option you might find these sweet potato paleo crackers to be more suitable for you.
What kind of cheese can I use?
- So long as you use a hard cheese – something like cheddar/red leicester you can really you whatever you like. Pepper jack would be excellent if you want a cracker with a kick.
Can I use vegan/dairy free cheese?
- Yes! Again, just make sure it’s a grated hard cheese and you should be fine. You can also use dairy free/vegan butter if you want to make vegan crackers.
Can I make these crackers without a food processor?
- Yes! While the food processor is great for breaking up the cheese and mixing everything together thoroughly you can absolutely make these crackers with nothing more than a bowl, a fork and a little elbow grease. Your crackers might be a little more streaky, but you’ll still walk away with some bomb crackers in the end.
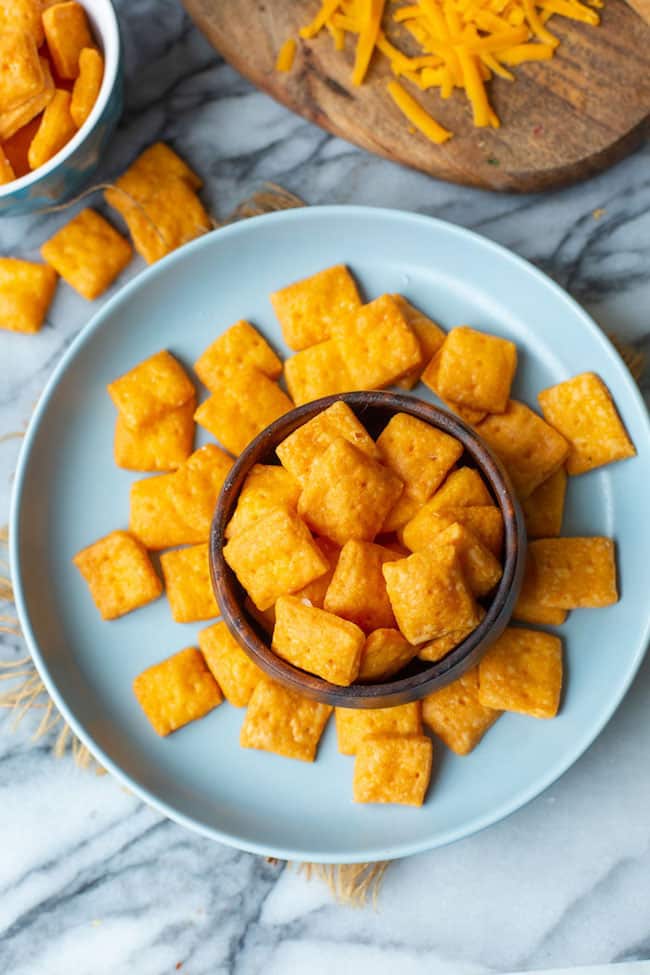
I really enjoy the crispy-crunchiness of these crackers. If you’re more interested in a slightly softer texture more like that of a Ritz cracker then I recommend cutting the cook time by 2-3 minutes.
When you’re all set to snack on enjoy these along side your favourite dip! If you need a little dip inspo here are a few of my favourites:
- Roasted Fennel & Green Olive Tapenade
- Sriracha Lime Hummus
- Sun Dried Tomato White Bean Dip
- Cauliflower Pizza Dip
- Roasted Carrot Hummus
- Basil Avocado Dip
- Chipotle Mayo
Enjoy!
FACEBOOK | INSTAGRAM | PINTEREST
Don’t forget to @asaucykitchen on instagram if you try these Cheesy Gluten Free Crackers! We love seeing what you make! You can also post your pictures to my facebook page!

Cheesy Gluten Free Crackers
These homemade cheesy gluten free crackers are easier to make than you might think. With just six, basic ingredients and a little patience waiting for the dough to chill you’ll be done before you know it! | Gluten Free + Nut Free + Gum Free
Ingredients
- 1 cup (140 g) gluten free all purpose flour blend
- 1/4 teaspoon sea salt
- 1/2 teaspoon baking powder
- 1 cup (4 oz) grated cheese (use a hard cheese like cheddar, jack, red leicester etc)
- 1/4 cup (56 g) cold butter cut into cubes
- 1/4 cup (60 ml) ice cold water
Instructions
- Add the flour, salt, baking powder and grated cheese to a food processor and blend together for about 30 seconds until fully combined.
- Add the butter and blend until a sandy mixture forms. Add the water and blend once more until a soft, slightly sticky dough forms.
- With lightly floured hands, take the dough and press into a round disc. Wrap tightly in plastic wrap and transfer to the fridge to chill for about 45 minutes.
- Preheat oven to 3750F/180°C. Line a large baking tray with baking paper.
- Lay out a large sheet of baking paper on a flat surface. Divide the dough into two portions and place one half of the dough in the middle of the baking paper. Use a rolling pin to roll out the dough in a rectangular shape until it's about 1/8 inch thick.
- With a sharp knife or pizza cutter, cut the dough into squares about 1 inch wide. Use a small fork or tooth pick to prick holes in the centre of each squares.
- Transfer the squares onto your prepared baking sheet. Leave a little bit of space between each square. Place in the middle of the oven and bake 19-20 minutes until cooked. Let cool at least 5 minutes before moving from the tray and enjoy!
- Crackers will keep at room temperature for a week. Leave them in an open container (not sealed) to maintain crunchiness.
Notes
- Any gluten free all purpose flour blend will work including my homemade gf blend. You do not need a blend with xanthan or guar gum.
- It's important to make sure that you let the dough chill in the fridge long enough so that the crackers don't spread as they cook.


Pat says
I have tried so many cheese cracker recipes from online that have always came out of the oven like soft cookies. I decided to try these last night because the page says “crispy” and “crunchy” more than once, which none of the other recipes did I followed the recipe. Initially they came out nice and crispy. By the time the 2nd batch came out of the oven, I could already feel the texture of the first batch getting slightly soft. I let them cool off completely. Then I put in a glass baking dish for storage. Since the first batch was already getting soft, I opted to cover mine. Florida humidity is high even in the winter with my dehumidifier running. Checking them this afternoon, they are completely soft. They did retain a fairly strong cheese flavor. It seemed like the crispness last night enhanced the cheese flavor.
Sarah Nevins says
Hi Pat!
Have you ever tried cooling your homemade crackers in the oven with the door left wide open?
I sometimes find this helpful when I’m making granola or something where I really want it crispy in the end. The idea is that the residual heat will continue to cook out some of the remaining moisture in the crackers while the open door allows this moisture/steam to vent out of the oven.
Since the 1st batch came out more crispy but the 2nd started going a bit soft earlier, I think this could help. You could also wait to cool both batches at the same time – so bake the first batch as directed and remove it from the oven. After the last batch, return all the crackers to the (turned off) oven for at least 15 minutes, or until they’re totally cooled.
One thing you could try for leftover crackers that have gone too soft too soon is the re-crisp them up in the oven by baking them again for about 2-3 minutes in the oven at 425°F/220°C. This is unfortunately a bit more tedious, but is a good option that you could try with most homemade cracker recipes – not just this one here.
Sorry to hear they didn’t stay crisp for long, but I’m glad the cheese flavor was strong!
Lynette says
I have just made these, cheesy crackers. Wow! Amazing! Some were slightly chewy, but that may be because the dough was slightly thicker, but crispy or chewy, they are fantastic!
Sarah Nevins says
So pleased to hear that – thank you so much, Lynette!
Kevin says
Fantastic cheesy cracker thank you for the recipe! Made two batches last night. What to love about them: super easy to make and I mean super easy, simple and few ingredients, delicious flavor, and unlimited possibilities to experiment with other cheeses and flavors. Second batch we used pecorino romano cheese, and added some thyme. But the basic recipe is fantastic enough. No more crackers from the store!
Sarah Nevins says
Oooh, I love the sound of your second batch! Will have to try these with those additions! So glad you enjoyed the recipe – thank you so much for coming back to let me know your thoughts 🙂
Kay says
Had a cheesy cracker recipe we loved for years… BEFORE our daughter was diagnosed as celiac. Was thrilled that these are an almost perfect replica. From my original recipe, I added about 1/2 tsp. mustard powder (gives it that nip). So happy to find “old favourites” that we can still enjoy.
Sarah Nevins says
Hi Kay! That makes me so happy to hear! I’m so glad you’ve been able to enjoy an old favourite through these 🙂
I also love the sound of adding a bit of mustard powder to the dough – will definitely be doing that the next time I make these!
Ash M says
Theses are a massive hit with my family! We’ve recently started the low fodmap diet and I’ve been trying out new recipes and love this one so much! Simple, delicious, fairly healthy!
Sarah Nevins says
Thanks Ash! So happy you guys were able to enjoy them! Thank you so much for coming back to let me know what you thought 🙂
Mandy says
These are WONDERFUL! Thank you for the receipe
Sarah Nevins says
Thanks Mandy! So glad you enjoyed them – thanks so much for coming back to let me know what you thought!
Lia says
Hello! Can I use olive oil instead of butter?
Sarah Nevins says
Hi Lia! I haven’t tried it with oil yet so I can’t say for sure, but I do think it would work!
Lia says
I’ve tried making it with oil over the weekend, and it worked! Thank you for sharing this recipe, Sarah!
Sarah Nevins says
Oh perfect! Thanks so much for letting me know – glad you enjoyed the crackers!