

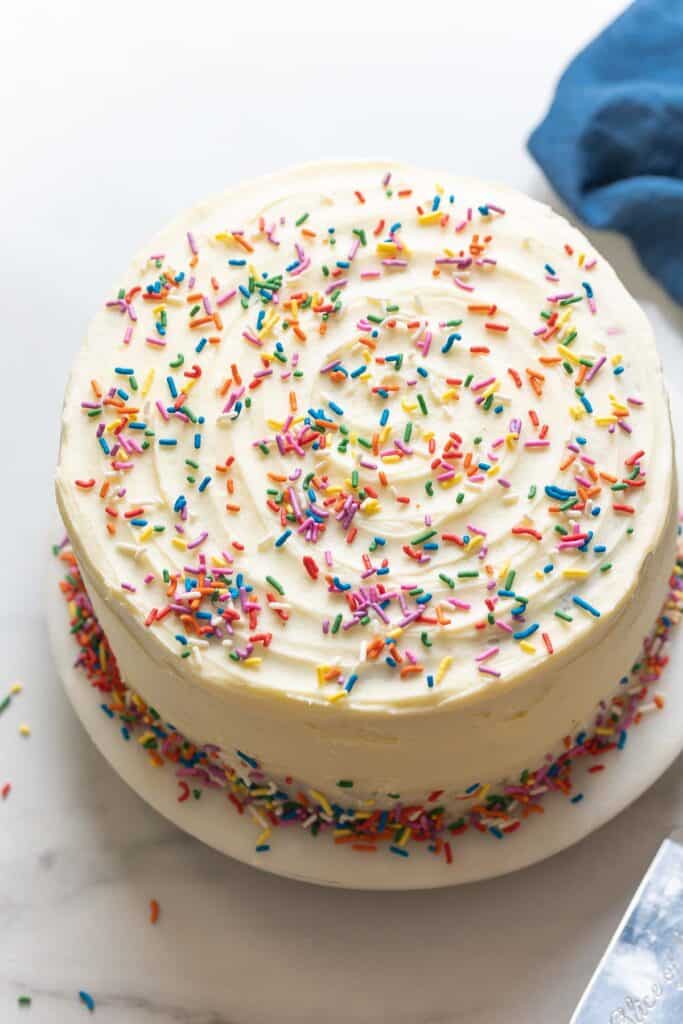
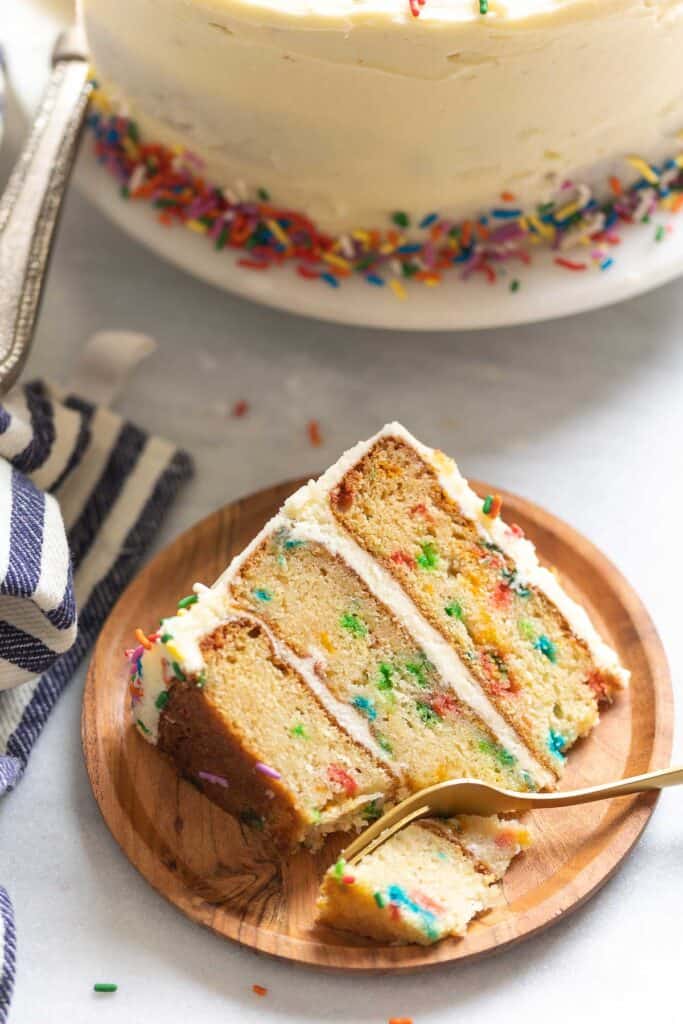
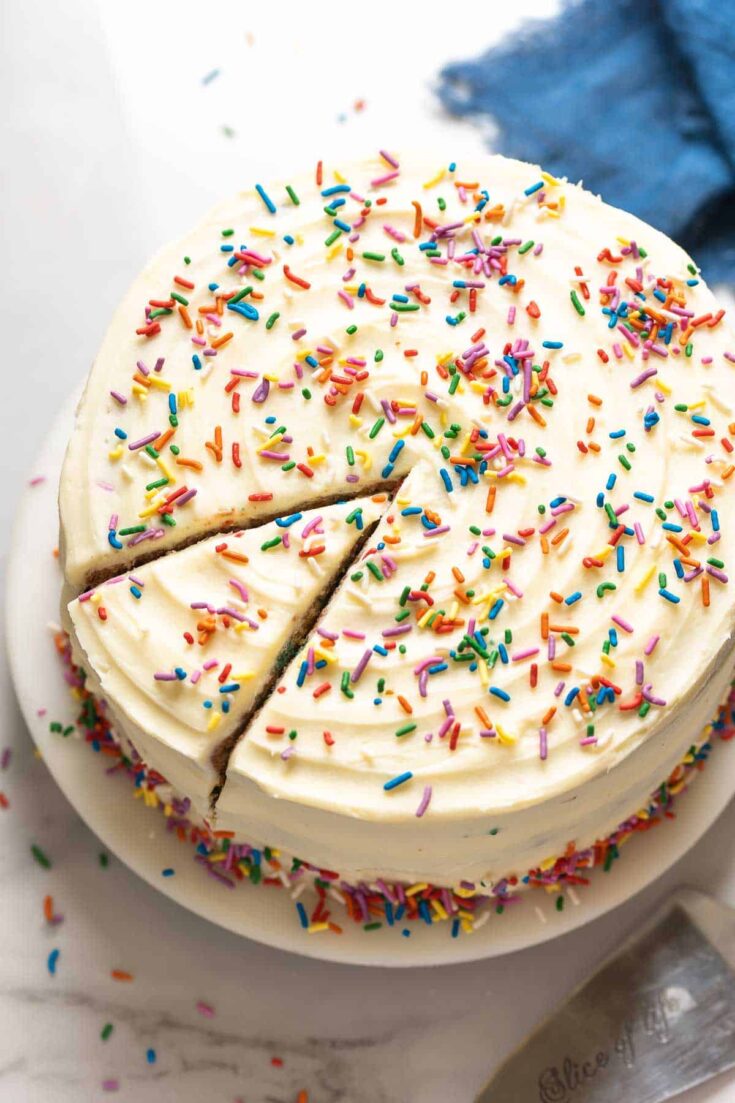
This Gluten Free Funfetti Cake has everything you want in a classic vanilla cake – a tender texture, moist crumbs, soft & pillowy cake layers and a buttery-vanilla flavor. Mix in the colorful rainbow sprinkles to complete the iconic look, then frost in a classic vanilla buttercream frosting.

🎂The Perfect birthday Cake🎂
Nothing says ‘birthday celebration!‘ quite like a confetti cake and for good reason!
This Gluten Free Funfetti Cake is everything you want out of a classic vanilla cake: it’s soft, pillowy, moist, tender and slathered in a delicious vanilla frosting.
Don’t forget the colorful sprinkles to complete the iconic look! It’s so good, you’ll impress not just your gluten free friends, but the gluten free skeptics as well!
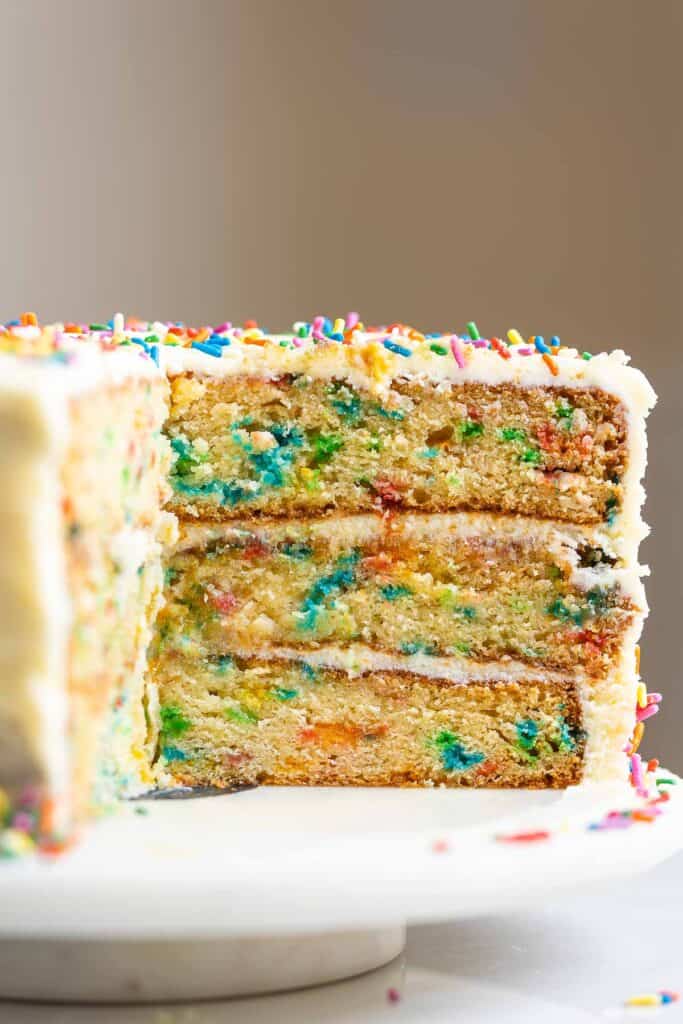
Homemade Gluten Free Funfetti Cake
Ingredients
- GF Flour + Xanthan Gum: Use your favorite gluten-free flour blend here. My go-to store bought flour is the Gluten Free Plain White Flour because it’s affordable and easy to find where I live. Bob’s Red Mill 1:1 baking flour (blue bag) is a great option, though I don’t love their GF all purpose blend (red bag).
- Butter + Oil: Butter provides a rich and buttery flavor, but it can create dense cake in large amounts. Oil, on the other hand, is great at creating a moist crumb thanks to the high fat content. Too much oil though can leave you with a greasy cake. Use a combination of butter and oil to get the right balance of both flavor and texture.
- Milk + Yoghurt: These provide hydration and acid. The moisture creates a soft, moist crumb and the acid works with the baking soda to help leaven the cakes (rise up in the oven).
- Baking Powder + Baking Soda: Baking powder is great at adding height to baked goods, but too much leaves an unpleasant after taste. Add baking soda to the mix to interact with the acidic yoghurt & milk for extra lift and a delicious tang.
- Eggs: Eggs provide moisture and structure. I’d like to make an egg-free version of this cake at some point, but I need to do a lot more testing before I can provide a reliable alternative.
- Vanilla + Salt: Our flavor enhancers!
- Rainbow Sprinkles: For best (most vibrant) results that won’t dissolve or fade in the oven, use American-style ‘rainbow sprinkles also known as ‘Jimmies’. Make sure to use gluten free sprinkles!
bite-Sized Recipe Steps
- Bowl #1: Dry ingredients
- Bowl #2: Wet ingredients
- sift & whisk dry ingredients – set aside
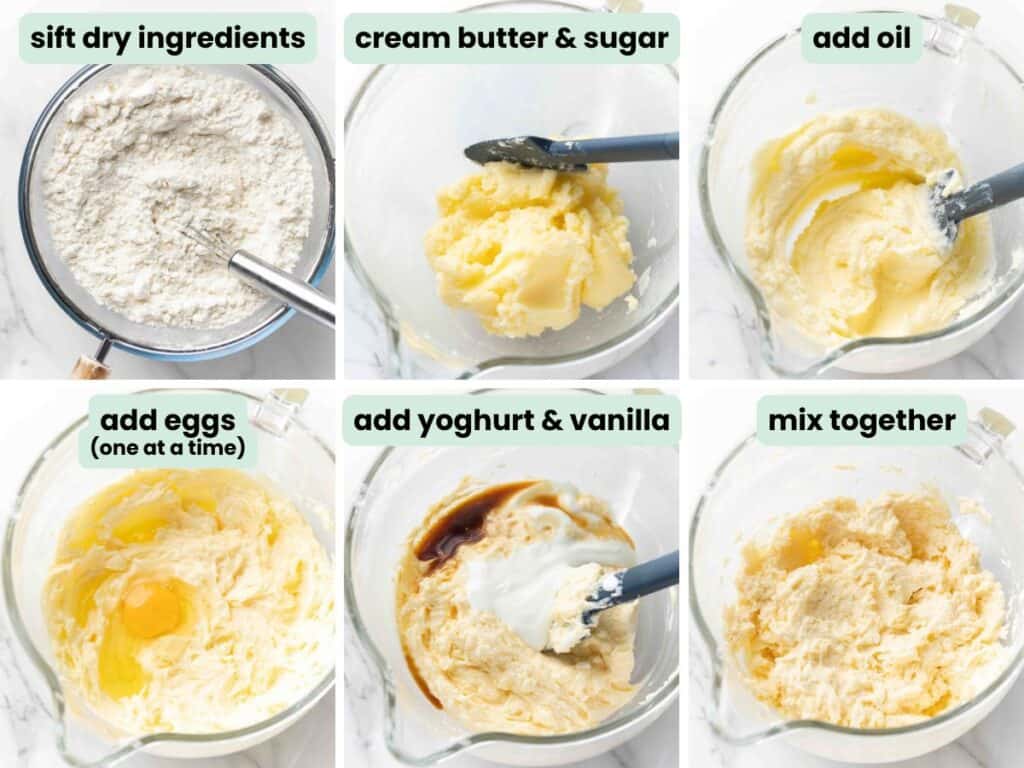
- cream butter & sugar
- add oil
- add eggs one at a time
- add yoghurt & vanilla
- mix into a smooth, thick batter
Combine Wet & Dry Ingredients
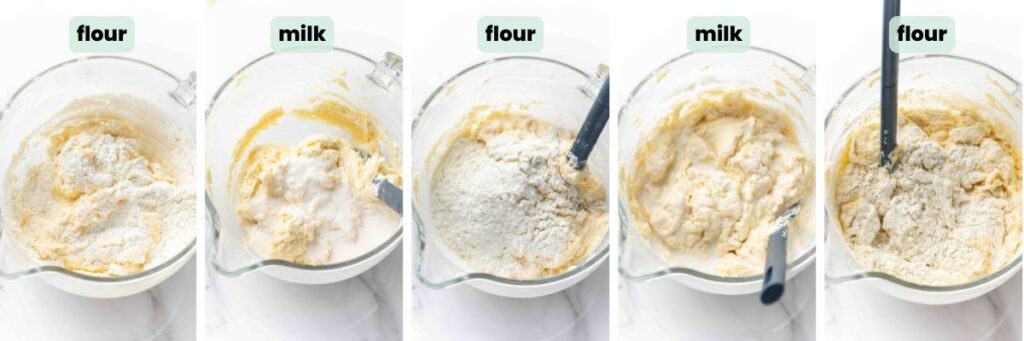
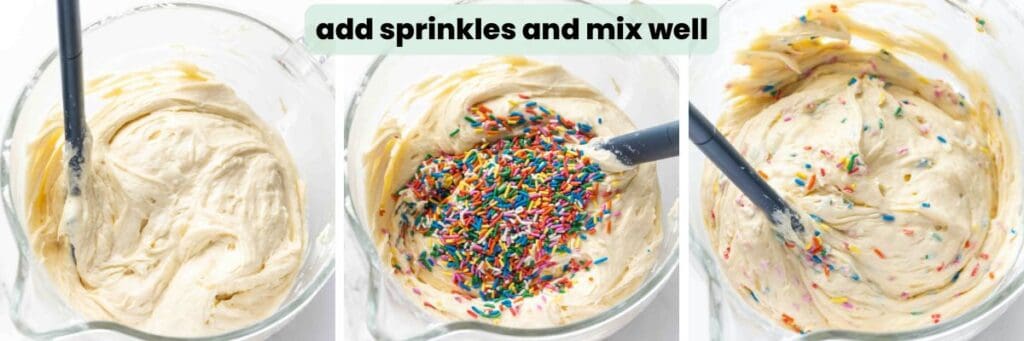
Finally, add the dry ingredients and milk to the cake batter in alternating intervals, mixing in between each addition like so:
- flour, milk, flour, milk, flour
Once combined, fold in the sprinkles and mix well to evenly combine.
Why alternate flour & milk additions?
The goal is to ensure the milk fully mixes and is absorbed into the butter mixture.
If you add the milk too early or all at once, the butter will oversaturate and the batter will separate. The fat solids will sink down and the liquids will rise to the top.
Alternating flour and milk additions to make sure everything mixes together easily and evenly.
Bake & Cool
- Divide the batter between prepared cake pans.
- Bake for about 27-30 minutes.
- Run a knife along the outside of the pans to loosen the cake from the sides then flip & cool on a cooling rack before frosting.

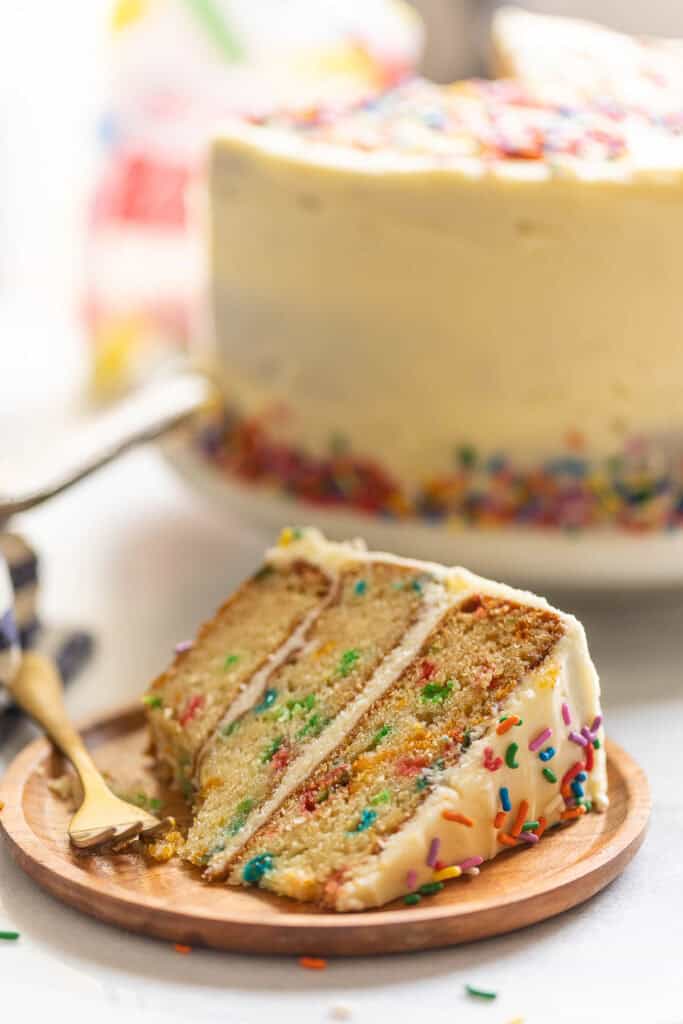
Frost & Enjoy
I stuck with a basic vanilla buttercream frosting to keep it simple and classic.
For a less sweet alternative, I recommend doubling my Whipped Mascarpone Frosting.
My favorite frosting variation that I tried while testing this recipe was a buttercream + mascarpone combination. I basically followed the frosting recipe instructed below, but swapped out 1/2 cup butter with 1/2 cup mascarpone. The end result was an extra silky vanilla buttercream.
Recipe Questions
What type of sprinkles to use?
For best results (most vibrant) that won’t dissolve or fade in the oven, use American-style rainbow Jimmies.
These are usually fairly easy to find in the US, but might be trickier in other countries. Standard, grocery store sprinkles available here in the UK do not hold up well baked into things. Best case, the sprinkles fade into little hints of color. Worst case, your cake ends up a bit muddy looking.
I recommend buying something like these Get Baked Rainbow Sprinkles here.
Sure, it might feel a bit excessive to buy ✨fancy✨sprinkles online, but we’re already making a rainbow colored funfetti cake so really this seems like the logical move.
Do I have to add sprinkles?
Nope!
Leave them out and you’ll end up with an equally delicious gluten free vanilla cake!
Can I freeze this cake?
Yes! You can easily freeze this cake, frosted or unfrosted.
Freeze unfrosted, individual cake layers: Bake, then cool the cake layers as directed. Once fully cooled, wrap the cake layers tightly in plastic wrap then wrap again in a layer or two of foil OR place in a large freezer safe bag.
You can frost the cakes while frozen. The frosting might be tricky to spread at first due to the cold temp, but after a quick crumb coat, you might find it’s much easier this way!
Unfrosted cakes last up to 3 months, but are best enjoyed within a month.
Freeze frosted cake: I recommend you freeze individual cake layers for ease and speed. Lay the cake slices out on a large, lined baking sheet and freeze, uncovered, about 30 minutes to firm up the cake + frosting. After flash freezing, wrap up the slices in plastic wrap then add to large freezer safe bag and keep up to 3 months.
Defrost in the fridge or at room temperature. The thaw time will mostly depend on how large your slices are, but 30 minutes at room temp will usually do just fine.
More Gluten Free Cake Recipes
- Gluten Free Victoria Sponge Cake Recipe
- Gluten Free Carrot Cake
- Gluten Free Chocolate Cake
- Gluten Free Vegan Vanilla Cake (Eggless Cake)
- Gluten Free Banana Cake & Cream Cheese Frosting
- Gluten Free Lemon Cake with Blueberry Filling
- Gluten Free Swiss Roll with Strawberries & Cream
- Gluten Free No Bake Cheesecake
Enjoy!
Let me know if you try this Gluten-Free Funfetti Cake recipe! I’d love to hear what you made with it and how it turned out! Please leave a comment and review with your thoughts and suggestions for me and future readers.
Gluten Free Funfetti Cake
It's everything you want in a classic vanilla cake - soft, tender & moist with an extra colorful helping of rainbow sprinkles!
Ingredients
- 3 cups gluten free all purpose flour blend (420g)
- 1 tsp xanthan gum
- 1 ½ tsp baking powder
- 1 ½ tsp baking soda
- 1 tsp salt
- 1 cup butter, room temperature (226g)
- 2 cups white granulated sugar (400g)
- ⅓ cup vegetable oil or another neutral flavored oil (80ml)
- 1 tbsp vanilla extract
- 4 large eggs, room temperature
- 1 cup whole milk (240ml)
- ¾ cup plain yogurt (180ml)
- 3/4 cup rainbow sprinkles, ensure gluten free (135g)
Vanilla Buttercream
- 1 1/2 cup butter, room temperature (340)
- 5 cups powdered sugar (625g)
- 1/3 cup whipping cream (80ml)
- 1 tbsp vanilla extract
Instructions
- Preheat oven to 350°C (177°C). Grease and line the bottoms of three 8 inch round cake pans. Set aside.
- In a large mixing bowl: whisk & sift together flour, xanthan gum, baking powder, baking soda and salt. Set aside.
- In a different large mixing bowl with a handheld mixer or in a stand mixer with a fitted paddle attachment: Beat butter and sugar on a medium-high speed for about 3-5 minutes until fully combined into a fluffy, pale mixture. Make sure to stop and scrape down the sides of the bowl every so often.
- Add the oil and mix on a medium speed until combined. Then add eggs one at a time, thoroughly mixing after each addition.
- Add the yoghurt and vanilla extract.
- Next, add the flour mixture and milk in alternating intervals like so: flour, milk, flour, milk, flour. Gently mix batter in between each addition. Make sure to scrape down the bottom and sides of the bowl as needed. Fold in the sprinkles.
- Pour the batter into the prepared cake pans then spread out in an even layer. Bake for 27-30 minutes. To check for doneness, insert a knife or tooth pick into the centre of the cake. If it comes out clean it's done.
- Run a knife along the edge of the cake pans to loosen the cake from the sides then flip over onto a wire rack to finish cooling. Make sure to fully cool the cake layers before frosting.
Frosting
- Beat butter on high for a minute or two until pale and fluffy with a hand mixer or in a stand mixer.
- Add sugar, vanilla and cream to the bowl and mix on a low speed until mostly combined then increase speed and mix on high for 2 minutes on thick and creamy. Add more sugar if the frosting is too sticky and add more cream if it's too thick/dry.
- Place one cake layer on a cake stand or serving plate. Add about 1 cup of frosting and spread over the top in an even layer. Repeat with the second layer, spreading about 1 cup frosting over the top of the cake. Add the last layer then frost the top and sides of the cake. Add more sprinkles if you like.
- Slice and serve right away or save for later. You can leave this cake, covered at room temperature for a few days, but it depends on your kitchen temperature so you may prefer keeping it in the fridge (up to 5 days). If stored in the fridge, I recommend you let it sit at room temp for about 30 minutes before serving for best flavor.
Notes
- Make sure to use room temperature ingredients.
- Yoghurt substitute: Swap yoghurt for sour cream OR leave out the yoghurt and regular milk and use 1 1/2 cup buttermilk instead. Add an extra 2-3 minutes to the overall bake time.
- DIY Buttermilk: Use regular dairy milk OR dairy-free milk. Measure out 1 1/2 cup (360ml) milk, remove 2 Tbsp milk and add 2 Tbsp lemon juice, apple cider vinegar or white vinegar. Let sit for 5-10 minutes until curdled before using.
- Sprinkles: Use American-style 'Jimmies' if you want a vibrant color. Naturally colored sprinkles will likely fade and lose color in the batter. If you're in the UK, I recommend these Get Baked Sprinkles.
- Cupcakes: This will make about 2 1/2 dozen cupcakes. Line & grease cupcake pan and fill each cup about 2/3 full. Bake at 350°C (177°C) for 18-20 minutes.
Leave a Review!