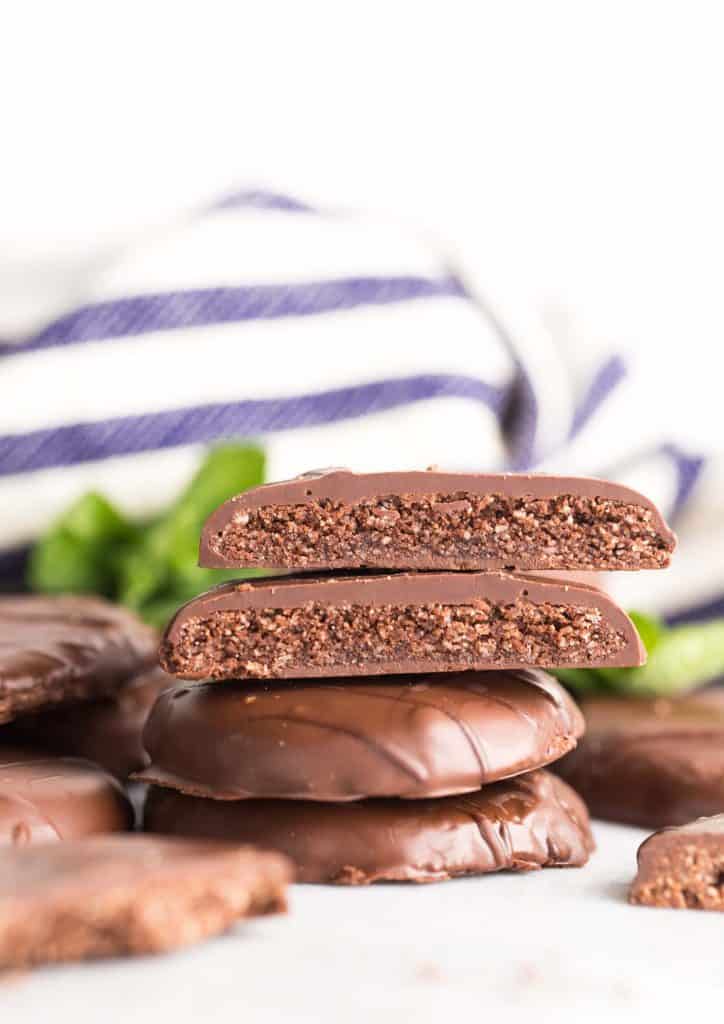
Copycat Gluten Free Thin Mints – Made with a super fast and easy, chocolatey almond flour cookie punched up with a splash of peppermint then dunked and drizzled in dark chocolate. | Gluten Free + Paleo + Vegan

It’s probably a good thing that you can’t buy Girl Scout Cookies in England because as a former seller of said cookies – the temptation of devouring a box is much greater than my will power.
While Samoas were my ultimate weakness I also consider Thin Mints to be another S-tier choice when it came to these cookies. How could you not love a chocolatey-peppermint cookie dunked in even more chocolate? And a thin mint cookie, cool and crisp straight out of the freezer? Say no more!
Since my other favourite cookie got a healthier, gluten free makeover in the form of these No Bake Samoas Cookie Bars (kind of a mouthful, I know) and these Homemade Tagalongs the time felt ripe to make these insanely addictive and utterly satisfying gluten free thin mints. So let’s get to it!

Gluten Free Thin Mints Breakdown
Altogether these gluten free thin mints are super easy to make and made with only nine ingredients. At first glance it might seem like a lot of steps because of the rolling and cutting, but in reality it’s actually not that much work needed to into these cookies.
Cookie Prep & Tips
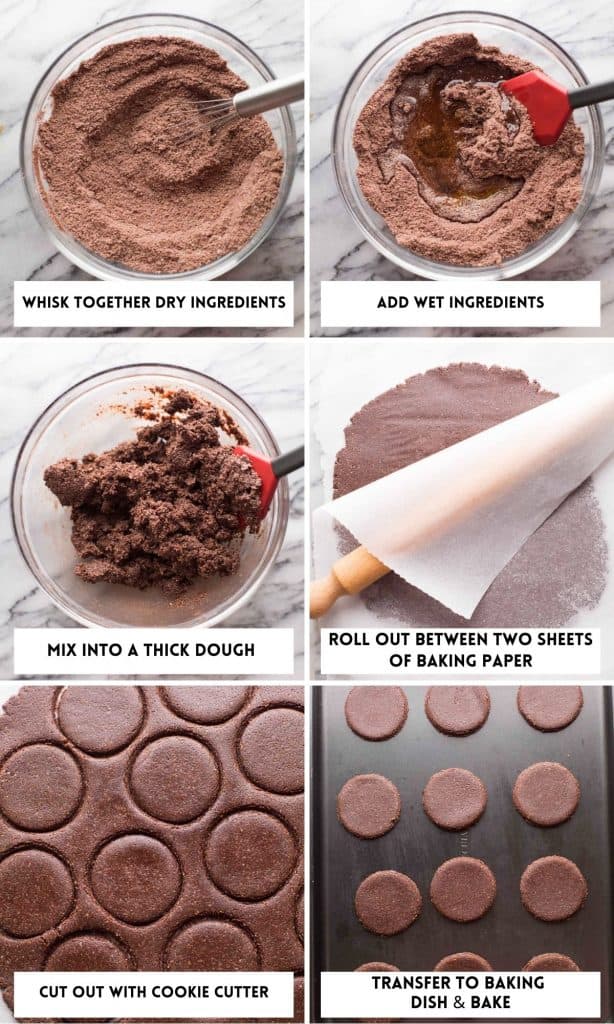
- Make the dough: Simply whisk together the dry ingredients and then stir in the wet ingredients until a thick dough forms.
- Roll out the dough: Ball up the dough and place it in between two large sheets of baking paper and then roll it out flat.
- Cut into cookies: Use a round cookie-cutter about 2 inches wide and cut the dough into as many cookies as you can. Keep rolling out the dough and cutting until none is left.
- TIP: If you don’t have any cookie cutters available look for small jar lids or bowls that you can use as a cookie cutter instead. The cookie cutter (or cutting utensil) doesn’t need to be exactly 2 inches but just keep in mind that the larger your cookie cutter the less cookies you’ll end up with.
- Bake & cool: Transfer your cookies to a prepared baking sheet. The cookies should spread much in the oven so you can fit quite a few cookies on your tray. Bake for about 10 minutes then cool completely.
- NOTE: If you live in a warm environment or have a hot kitchen you may want to refrigerate your cut out cookies on the baking sheet for about 20 minutes before baking. I did not have this issue myself when making these cookies, but based off of my general experience with baking with coconut oil – when it’s hot outside I know it can sometimes lead to cookies that spread too much in the oven. You can usually prevent this from happening simply by chilling your dough before baking.
Mint Chocolate Coating
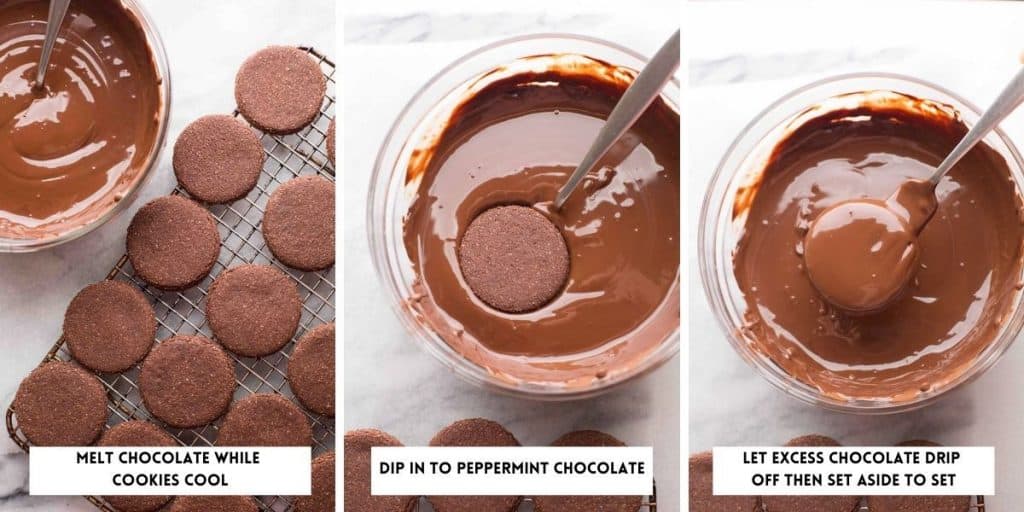
While your cookies cool, start working on melting and prepping your chocolate. There are a couple of ways to melt your chocolate:
- Double Boiler Method: Place chocolate in a heat proof bowl that’s large enough to sit over the top of a small sauce pan. Add an inch of water to the sauce pan and bring to a simmer. Once the water is simmering place the bowl of chocolate over the top of the bowl, make sure that the water doesn’t touch the bottom. Stir the chocolate as it melts. When there are only a few chunks of chocolate left remove the bowl from the heat. The residual heat will be enough to melt the rest. Stir in the coconut oil and peppermint extract. Set the bowl aside to let the chocolate cool.
- Microwave Method: Place the chopped chocolate in a heat safe bowl and pop in the microwave to melt at 30 second intervals stirring in-between so the chocolate doesn’t start burning. Once your chocolate has melted, stir in the coconut oil and peppermint and set aside to cool until you’re ready to dip your cookies.
Why add oil to the chocolate?
Two reasons:
- Oil will prevent the chocolate from seizing from the (alcohol based) peppermint extract.
- Oil will help thin out the chocolate just enough to make it easier to dip the cookies.
Can I use peppermint oil instead of peppermint extract?
Yes, but not all oils are meant for consumption so make sure that your oil is a food-grade oil. If you’re using oil you will also need to make sure to be light-handed with your amounts. Oils are much stronger than extracts. Start with a small amount of peppermint oil, taste the dough or chocolate and than add more if you think it needs it.
FACEBOOK | INSTAGRAM | PINTEREST
Don’t forget to #asaucykitchen on instagram if you try making these Gluten Free Thin Mints. We love to see what you make with it! You can also post your pictures to our facebook page!

Gluten Free Thin Mints (Vegan)
Copycat Gluten Free Thin Mints - Made with a super fast and easy, chocolatey almond flour cookie punched up with a splash of peppermint then dunked and drizzled in dark chocolate. | Gluten Free + Paleo + Vegan
Ingredients
Cookies
- 2 cups | 192 g almond flour
- 2 tablespoons |14 g coconut flour
- 1/4 cup | 30 g cocoa powder
- 1/2 teaspoon salt
- 1/4 cup | 56 g coconut oil, melted
- 6 tablespoons | 120 g maple syrup
- 1 teaspoon vanilla extract
- 1/2 teaspoon peppermint extract
Chocolate Topping
- 300 g dairy free chocolate (chips or chopped)
- 1 teaspoon coconut oil
- 1/2 teaspoon peppermint extract
Instructions
Cookies
- Preheat oven to 325°F/ 160°C. Line or lightly grease or line couple of baking sheets and set aside.
- In a large mixing bowl whisk together the almond flour, coconut flour, cocoa powder and salt.
- Add the melted coconut oil, maple syrup, vanilla extract and peppermint extract. Stir until a thick dough forms.
- Place the dough in between two large pieces of baking paper and roll out until about 1/8inch-1/4inch thickness.
- Peel off the top layer of baking paper and cut the dough with a cookie cutter into 2 inch round cookies. Carefully transfer each cut out cookie to your prepared baking sheets. Leave about 1 inch in between each cookie. Re roll and cut out the dough until all of the dough has been used.
- Bake the cookies in the middle of the oven for 9-11 minutes. The cookies shouldn't change much in appearance, but look around the edges to see if they look set.
- Cool on the baking sheets for about 5 minutes then cool completely on a wire rack before dipping into chocolate.
Chocolate Coating
- Melt the chocolate and oil in a microwave or double boiler (see notes on each method below).
- Once the chocolate has melted, stir in the peppermint extract. Let the chocolate cool enough to handle and then begin dipping cookies. Dunk each cookie into the chocolate until completely covered and then lift out with a fork. Let the excess chocolate drip off then transfer to piece of baking paper or silicone mat. Repeat until each cookie has been dipped. Drizzle any leftover chocolate over the tops.
- Let the cookies cool at room temperature or speed up the process by transferring them to the refrigerator to set and enjoy!
- Cookies will keep at room temperature for 3-4 days or at least a week in the fridge. You can even keep them in the freezer for 2-3 months.
Notes
- Make sure to use peppermint extract and not mint extract. Mint extract tastes more like spearmint toothpaste.
- If you live in a hot climate or it's a warm season I recommend chilling the rolled out, pre-cut cookie dough in the fridge for at least 20 minutes before baking to prevent the coconut oil from spreading too much in the oven.




Michele says
Will this work with all purpose gluten free flour? I cannot have almond flour.
Sarah Nevins says
Hi Michele!
In theory this could work with all purpose gluten free flour, the problem is that it wouldn’t be a simple cup for cup swap. Almond flour has a high fat content which translates into moisture in baked goods. Often times when almond flour is used in place of all purpose flour, you end up needing increase the amount of almond flour quite a bit to reestablish the balance between wet/dry ingredients.
With that in mind, I couldn’t confidently say how much of the recipe would need to be adjusted to make it work with all purpose flour without playing around with it first. I’d just hate to steer your wrong here and have you end up with wasted ingredients. Sorry I couldn’t be more help here!
Brittany says
These were so yummy! Now I can have thin mints year round!
Sarah Nevins says
Yay! Glad you enjoyed them! Thanks so much for coming back to leave a review!
Sabrina says
thank you, I’ve been avoiding the conventional thin mints for the “bad” carbs, so happy you’ve come up with a recipe with almond and coconut flour and no refined sugar that works!
Sarah Nevins says
Yay! Hope you love them as much as we do!